On-device Federated Finetuning for Speech Classification#

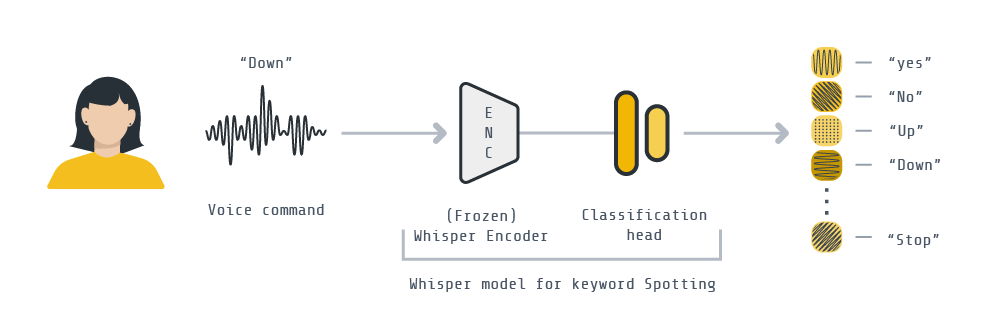
This example demonstrates how to, from a pre-trained Whisper model, finetune it for the downstream task of keyword spotting. We’ll be implementing a federated downstream finetuning pipeline using Flower involving a total of 100 clients. As for the downstream dataset, we’ll be using the Google Speech Commands dataset for keyword spotting. We’ll take the encoder part of the Whisper-tiny model, freeze its parameters, and learn a lightweight classification (<800K parameters !!) head to correctly classify a spoken word.
This example can be run in three modes:
Centralized training: the standard way of training ML models, where all the data is available to the node doing the finetuning.
Federated Learning: the better way of doing ML, where a model is finetuned collaboratively by nodes (i.e. clients), each using their own data. These clients can run:
in simulation mode: a client is an ephemeral Python process with a portion of the system resources assigned to it.
in on-device mode: clients are detached entities and each can run on a different device.
Running the example#
Start by cloning the code example. We prepared a single-line command that you can copy into your shell which will checkout the example for you:
git clone --depth=1 https://github.com/adap/flower.git && mv flower/examples/whisper-federated-finetuning . && rm -rf flower && cd whisper-federated-finetuning
This will create a new directory called whisper-federated-finetuning containing the following files:
-- README.md         <- Your're reading this right now
-- rpi_setup.md      <- A guide that illustrates how to setup your RPi from scratch
-- sim.py            <- Runs the example with Flower simulation
-- server.py         <- Defines the server-side logic for the on-device setting
-- client.py         <- Defines the client-side logic for the on-device setting
-- utils.py          <- auxiliary functions for this example
-- centralised.py    <- Runs the example in centralized mode
-- pyproject.toml    <- Example dependencies (if you use Poetry)
-- requirements.txt  <- Example dependencies
This example can be run in different ways, please refer to the corresponding section for further instructions. This example was tested with PyTorch 2.1.0 for all the different ways of running this example except when running on the Raspberry Pi, which seemed to only work with PyTorch 1.13.1. Please note the requirement files do not specify a version of PyTorch, therefore you need to choose one that works for you and your system.
Centralized Training#
This section describes how to finetune Whisper-tiny for keyword spotting without making use of Federated Learning. This means that the whole training set is available at any point and therefore it is in its entirety to finetune the model each epoch.
On your favorite Python environment manager, install a recent version of PyTorch (PyTorch 2.0+ is recommended for faster training times). Then install the rest of the requirements. For instance:
pip install torch==2.1.0 --index-url https://download.pytorch.org/whl/cu118
pip install -r requirements.txt
Then run centralized training as follows. Please note that the first time you run the code, the SpeechCommnads dataset will be downloaded and pre-processed using 🤗 API (which takes a little while – approx 40min – and is cached in ~/.cache/huggingface/datasets/speechcommands wiht a footprint of ~83GB). Subsequent runs shouldn’t require this preprocessing.
python centralised.py --compile # don't use `--compile` flag if you are using pytorch < 2.0

# The script will save a checkpoint of the classifier head after each epoch
# These checkpoints followo the naming style: `classifier_<val_accuracy>.pt`

# You can load a checkpoint by passing it like this:
python centralised.py --checkpoint <my_checkpoint>.pt
Within 2 epochs you should see a validation accuracy of over 95%. On an RTX 3090Ti each epoch takes ~3min30sec. The final test set consistently reaches 97%+. Below is the log you should expect to see:
...
classifier_head_params = 781964
Initial (loss, acc): loss = 0.04124763025785586, accuracy = 0.03215788419154478
Epoch: 0
100%|████████████████████████| 84928/84928 [03:05<00:00, 456.93it/s, avg_loss=0.7269, avg_acc=0.8282]
VALIDATION ---> loss = 0.0051703976778501234, accuracy = 0.9319775596072931
Epoch: 1
100%|████████████████████████| 84928/84928 [03:07<00:00, 454.06it/s, avg_loss=0.1588, avg_acc=0.9629]
VALIDATION ---> loss = 0.003613288299632327, accuracy = 0.943097575636145
Epoch: 2
100%|████████████████████████| 84928/84928 [03:06<00:00, 454.16it/s, avg_loss=0.1208, avg_acc=0.9675]
VALIDATION ---> loss = 0.0022978041400064466, accuracy = 0.9610298537367261
Training done...
Evaluating test set. Loading best model
TEST ---> loss = 0.001703281509680464, accuracy = 0.9740286298568507
You made it work better ? Let us know how you did it by opening an GitHub issue or a PR and we’ll gladly incorporate your suggestions!
Federated Learning#
Centralized training is ok but in many settings it cannot be realised. Primarily because the training data must remain distributed (i.e. on the client side) and cannot be aggregated into a single node (e.g. your server). With Flower we can easily design a federated finetuning pipeline by which clients locally train the classification head on their data, before communicating it to a central server. There, the updates sent by the clients get aggregated and re-distributed among clients for another round of FL. This process is repeated until convergence. Note that, unlike the encoder part of the Whisper model, the classification head is incredibly lightweight (just 780K parameters), adding little communication costs as a result.
In this example, we partition the training set along the speaker_id column into 100 buckets to simulate that many groups of people. You can think of each group as an individual FL client that contains several users/speakers. One way to think about this is to view each client as an office with several people working there, each interacting with the Keyword spotting system. This example exclusively federates the training of the classification head.
from datasets import load_dataset
sc_train = load_dataset("speech_commands", "v0.02", split="train", token=False)
print(sc_train)
# Dataset({
#     features: ['file', 'audio', 'label', 'is_unknown', 'speaker_id', 'utterance_id'],
#     num_rows: 84848
# })

# The training set is comprised of ~85K 1-second audio clips from 2112 individual speakers
ids = set(sc_train['speaker_id'])
print(len(ids))
# 2113  # <--- +1 since a "None" speaker is included (for clips to construct the _silence_ training examples)
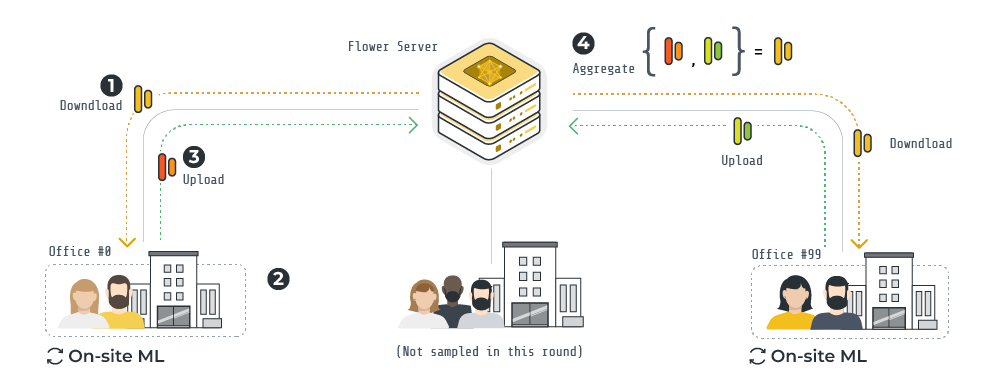
An overview of the FL pipeline built with Flower for this example is illustrated above.
At the start of a round, the server communicates the classification head to a fraction of the clients. At round #0, the classification head is randomly intialised.
Each client, using a frozen pre-trained Whisper encoder, trains the classification head using its own data samples.
Once on-site training is completed, each client sends back the (now updated) classification head to the Flower server.
The Flower server aggregates (via FedAvg) the classification heads in order to obtain a new global classification head. This head will be shared with clients in the next round.
Flower supports two ways of doing Federated Learning: simulated and non-simulated FL. The former, managed by the VirtualClientEngine, allows you to run large-scale workloads in a system-aware manner, that scales with the resources available on your system (whether it is a laptop, a desktop with a single GPU, or a cluster of GPU servers). The latter is better suited for settings where clients are unique devices (e.g. a server, a smart device, etc). This example shows you how to use both.
Preparing the dataset#
If you have run the centralized version of this example first, you probably realized that it takes some time to get a fully pre-processed SpeechCommands dataset using the 🤗 HuggingFace API. This pre-processing is ideal so nothing slowdowns our training once we launch the experiment. For the federated part of this example, we also need to pre-process the data however in a different way since first the training set needs to be split into N different buckets, one for each FL client.
To launch a Flower client we need a client_fn callable that will: (1) Load the dataset of the client; then, (2) return the Client object itself. In client.py we have included a few lines of code that preprocess the training partition of a given client and save it to disk (so this doesn’t have to be repeated each time you run the experiment). The average pre-processed partition is ~0.5GB. You can run the experiment right away and the data will be pre-processed on-demand (i.e. when the i-th client is spawned for the first time), or you can pre-process all client partitions first. In order to do so, please run:
# will write to disk all pre-processed data partitions
# by default these will go to a new directory named `client_datasets`
# Similarly to the centralised setting, this preprocessing will take a while (30mins approx)
python sim.py --preprocess
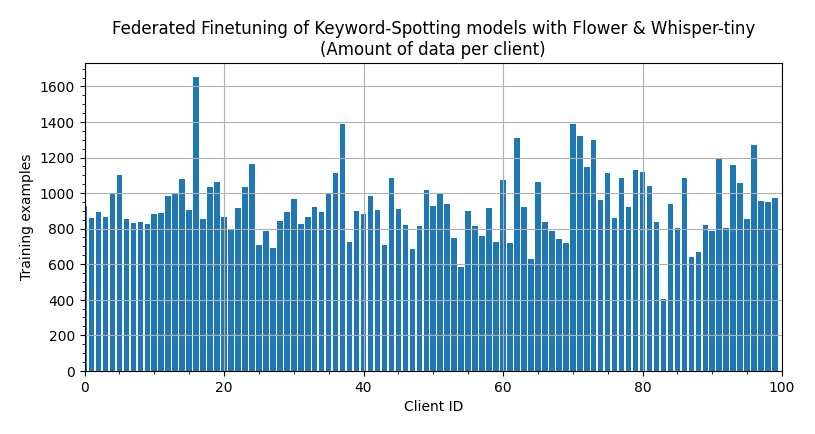
The resulting data partitions are not equal-sized (which is what you’d often find in practice in the real world) because not all speaker_id contributed the same amount of audio clips when the Speech Commands Dataset was created. If we make a bar plot showing the amount of data each client has this is the result.
Federated Finetuning (Simulation)#
The setup instructions for simulations are the same as those described for the centralized setting above: install PyTorch and then pip install -r requirements.txt. Then, you can launch your simulation as shown below. Without changes to the code or input arguments, the simulation will sample 10 clients per round, these would do 1 local epoch of finetuning the classification head while the encoder remains frozen. Once this is completed, the classification head is sent to the server for aggregation via FedAvg. By default, this example assumes you have a GPU available.
# By default it will run 2 clients in parallel on a single GPU (which should be fine if your GPU has at least 16GB )
# If that's too much, consider reduing either the batch size or raise `num_gpus` passed to `start_simulation`
python sim.py # append --num_gpus=0 if you don't have GPUs on your system

# Once finished centralised evaluation loss/acc metrics will be shown

INFO flwr 2023-11-08 14:03:57,557 | app.py:229 | app_fit: metrics_centralized {'val_accuracy': [(0, 0.03977158885994791), (1, 0.6940492887196954), (2, 0.5969745541975556), (3, 0.8794830695251452), (4, 0.9021238228811861), (5, 0.8943097575636145), (6, 0.9047285113203767), (7, 0.9330795431777199), (8, 0.9446002805049089), (9, 0.9556201162091765)], 'test_accuracy': [(10, 0.9719836400817996)]}
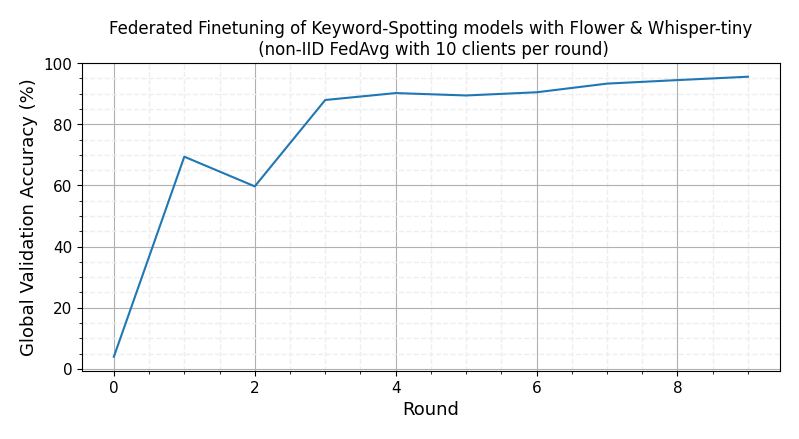
With just 5 FL rounds, the global model should be reaching ~95% validation accuracy. A test accuracy of 97% can be reached with 10 rounds of FL training using the default hyperparameters. On an RTX 3090Ti, each round takes ~20-30s depending on the amount of data the clients selected in a round have.
Take a look at the Documentation for more details on how you can customize your simulation.
Federated Finetuning (non-simulated)#
Running the exact same FL pipeline as in the simulation setting can be done without using Flower’s simulation engine. To achieve this, you need to launch first a server and then two or more clients. You can do this on your development machine assuming you have set up your environment already.
First, launch the server, which will orchestrate the FL process:
# The server will wait until at least two clients are connected
# you can use `--server_address='localhost'` if you are running everything on the same machine.
python server.py --server_addres=<YOUR_SERVER_IP>
Then on different (new) terminals run:
# use a difference `--cid` (client id) to make the client load a particular dataset partition (any integer between 0-99)
# you can use `--server_address='localhost'` if you are running everything on the same machine.
python client.py --server_address=<YOUR_SERVER_IP> --cid=0

# and on a new terminal/machine (and optionally a different `cid`)
python client.py --server_address=<YOUR_SERVER_IP> --cid=1
Once the second client connects to the server, the FL process will begin. Each client will report its training progress. The server process will do the same
# python client.py --server_address='localhost' --cid=50
# This client runs on a NVIDIA RTX 3090Ti
INFO flwr 2023-11-08 14:12:50,135 | grpc.py:49 | Opened insecure gRPC connection (no certificates were passed)
DEBUG flwr 2023-11-08 14:12:50,136 | connection.py:42 | ChannelConnectivity.IDLE
DEBUG flwr 2023-11-08 14:12:50,136 | connection.py:42 | ChannelConnectivity.CONNECTING
DEBUG flwr 2023-11-08 14:12:50,140 | connection.py:42 | ChannelConnectivity.READY
99%|████████████████████████| 920/925 [00:09<00:00, 93.39it/s, avg_loss=2.4414, avg_acc=0.1837]
99%|████████████████████████| 920/925 [00:04<00:00, 216.93it/s, avg_loss=2.0191, avg_acc=0.3315]
99%|████████████████████████| 920/925 [00:04<00:00, 214.29it/s, avg_loss=1.5950, avg_acc=0.5500]
99%|████████████████████████| 920/925 [00:04<00:00, 212.70it/s, avg_loss=1.1883, avg_acc=0.7348]
99%|████████████████████████| 920/925 [00:04<00:00, 208.69it/s, avg_loss=0.8466, avg_acc=0.8228]
99%|████████████████████████| 920/925 [00:04<00:00, 206.31it/s, avg_loss=0.6353, avg_acc=0.8837]
99%|████████████████████████| 920/925 [00:03<00:00, 266.73it/s, avg_loss=0.4842, avg_acc=0.9207]
99%|████████████████████████| 920/925 [00:04<00:00, 212.13it/s, avg_loss=0.3519, avg_acc=0.9391]
99%|████████████████████████| 920/925 [00:04<00:00, 213.17it/s, avg_loss=0.3233, avg_acc=0.9359]
99%|████████████████████████| 920/925 [00:04<00:00, 205.12it/s, avg_loss=0.2646, avg_acc=0.9543]
DEBUG flwr 2023-11-08 14:20:01,065 | connection.py:139 | gRPC channel closed
INFO flwr 2023-11-08 14:20:01,065 | app.py:215 | Disconnect and shut down
Federated Finetuning on Raspberry Pi#
Setting up the environment for the Raspberry Pi is not that different from the steps you’d follow on any other Ubuntu machine (this example assumes your Raspberry Pi – either 5 or 4 – runs Ubuntu server 22.04/23.10 64bits). Using the code as-is, RAM usage on the Raspberry Pi does not exceed 1.5GB. Note that unlike in the previous sections of this example, clients for Raspberry Pi work better when using PyTorch 1.13.1 (or earlier versions to PyTorch 2.0 in general).
Please follow the steps here if you are looking for a step-by-step guide on how to setup your Raspberry Pi to run this example.
In order to run this example on a Raspberry Pi, you’ll need to follow the same steps as outlined above in the non-simulated section. First, launch the server on your development machine.
# The server will wait until at least two clients are connected
python server.py --server_addres=<YOUR_SERVER_IP>
Then, on each of your Raspberry Pi do the following. If you only have one RPi, you can still run the example! But you will need two clients. In addition to the one on the Raspberry Pi, you could launch a client in a separate terminal on your development machine (as shown above in the non-simulated section).
# use a difference `--cid` (client id) to make this device load a particular dataset partition
# we pass the `--no-compile` option since for RPi we are not using PyTorch 2.0+
python client.py --server_address=<YOUR_SERVER_IP> --cid=0 --no-compile
The first time you run a client on the RPi, the dataset of a client needs to be extracted from the full train set and then pre-processed. The Raspberry Pi 5 is also faster in this pre-processing stage using .filter() and .map() of 🤗 HuggingFace Dataset. map() used num_proc=4:
Stage |
Notes |
RPi 4 |
RPi 5 |
|---|---|---|---|
Filter through training set (~85k rows) |
doing |
1:58 |
0.37 |
Encode 845 rows with |
doing |
1:55 |
1:06 |
Some clients have more data than others, but on average, the RPi5 is 1.9x faster than an RPi4 when training the classification head given a frozen encoder. A client with 925 training examples needs ~20min on an RPi to complete an epoch of on-device finetuning.
# Running the 50-th client on a RPi 5 showed the following log (a RPi4 ran client 83)
python client.py --cid=50 --server_address=<YOUR_SERVER_IP> --no-compile
INFO flwr 2023-11-08 16:20:33,331 | grpc.py:49 | Opened insecure gRPC connection (no certificates were passed)
DEBUG flwr 2023-11-08 16:20:33,333 | connection.py:42 | ChannelConnectivity.IDLE
DEBUG flwr 2023-11-08 16:20:33,334 | connection.py:42 | ChannelConnectivity.CONNECTING
DEBUG flwr 2023-11-08 16:20:33,349 | connection.py:42 | ChannelConnectivity.READY
99%|████████████████████████████████████████| 920/925 [20:09<00:06,  1.31s/it, avg_loss=2.4392, avg_acc=0.1902]
99%|████████████████████████████████████████| 920/925 [20:06<00:06,  1.31s/it, avg_loss=1.9830, avg_acc=0.3533]
99%|████████████████████████████████████████| 920/925 [20:06<00:06,  1.31s/it, avg_loss=1.6069, avg_acc=0.5641]
99%|████████████████████████████████████████| 920/925 [20:07<00:06,  1.31s/it, avg_loss=1.1933, avg_acc=0.7402]
99%|████████████████████████████████████████| 920/925 [20:07<00:06,  1.31s/it, avg_loss=0.8749, avg_acc=0.8478]
99%|████████████████████████████████████████| 920/925 [20:06<00:06,  1.31s/it, avg_loss=0.5933, avg_acc=0.9109]
99%|████████████████████████████████████████| 920/925 [20:08<00:06,  1.31s/it, avg_loss=0.4882, avg_acc=0.9359]
99%|████████████████████████████████████████| 920/925 [20:01<00:06,  1.31s/it, avg_loss=0.4022, avg_acc=0.9304]
99%|████████████████████████████████████████| 920/925 [20:10<00:06,  1.32s/it, avg_loss=0.3219, avg_acc=0.9533]
99%|████████████████████████████████████████| 920/925 [20:13<00:06,  1.32s/it, avg_loss=0.2729, avg_acc=0.9641]
DEBUG flwr 2023-11-08 19:47:56,544 | connection.py:139 | gRPC channel closed
INFO flwr 2023-11-08 19:47:56,544 | app.py:215 | Disconnect and shut down